Article • 2 min read
Tip of the Week: Organize Incoming Tickets with Multiple Email Addresses
Dernière mise à jour March 18, 2010
Two important aspects of building your help desk workflow are Collecting and Processing your incoming tickets. You want to make it easy for your customers to get in touch but you also want to parse and sort through all the various requests.
One way to handle this in Zendesk is to create multiple email addresses to feed customer requests in rather than using only one general email. So, for instance, you might set up an email for sales@yourcompany.com; for bugs@yourcompany.com; for returns@yourcompany.com. You get the idea. Zendesk is built to handle multiple emails as soon as you sign up for an account. Simply forward any email address from any of your domains to your default Zendesk support email (which is: support@youraccount.zendesk.com) and Zendesk will Collect them all.
Ok, so that’s Collect. But where this starts to make a bigger impact is when you Process your incoming mail based on which email address it was sent to. Rather than just one big cluttered email inbox, your Zendesk can determine which email address the request was sent to and act upon it.
For example, let’s say you run an online clothing shop and you need to handle returns from some of your customers. Rather than have those customers send their return requests to your general support group which they then have to pass along to your Returns Department, you could instead set up an email address called returns@yourcompany.com. Once the ticket hits your Zendesk, it is routed automatically to your Returns Department. Collect and Process in one step.
Get Started with Collect and Process in Zendesk:
You (or your domain administrator) will need to set up the returns@yourcompany.com email address on your domain.
- Forward that email to returns@yourcompany.zendesk.com. Zendesk is set up to receive incoming tickets for any address on your default Zendesk domain – i.e. returns@yourcompany.zendesk.com; sales@yourcompany.zendesk.com; YahooSerious@yourcompany.zendesk.com. You don’t have to configure anything; try it out on your account, it just works beautifully.
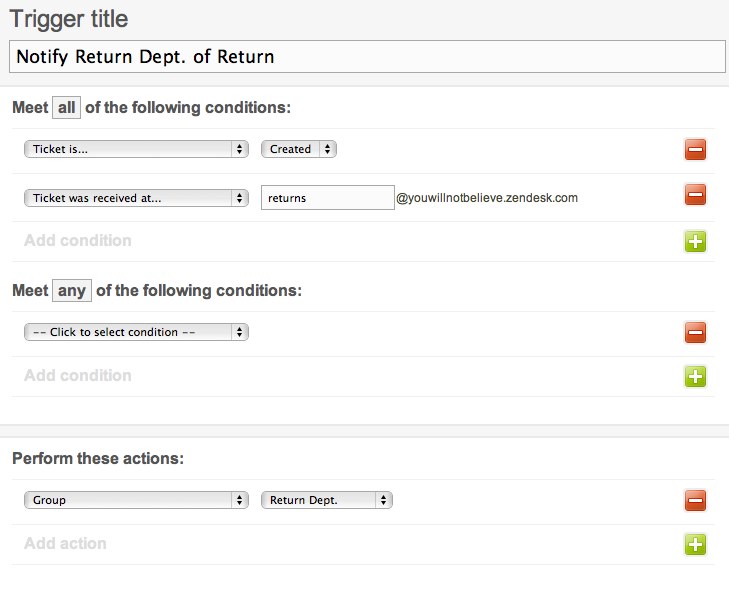
- Build a Trigger in Zendesk that recognizes the returns@yourcompany.zendesk.com address and routes it to your Returns Department Group. Triggers are set up by going to the Triggers and Mail Notifications under the Manage tab on your account. Groups — which are a collection of agents — are set up by going to the Manage tab and selecting People. It might look something like this:

Once you’ve got that set up, it’s rinse and repeat – set up as many email addresses as you need to help make sense of your incoming requests.
Of course, this is a rather straightforward example – you can do a lot more with Triggers, as well as leverage other parts of Zendesk like Automations and Views. Learn more about all of these features on our Video Tutorial Page.